Choosing a Roofing Contractor

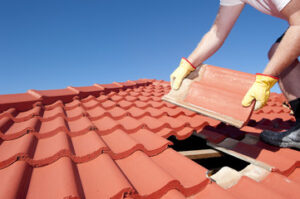
Roofing is the process of covering the top of a building to protect against rain, snow, sunlight and wind. There are a variety of materials used in roofing, including asphalt shingles, slate, clay or metal.

Roofing

Roofers Wilmington DE start each day with a safety talk and attend yearly training. They work with a team on flat or pitched roofs, often on ladders and in the sun.

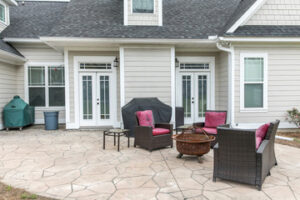
The average roof replacement costs about $30,000, and it’s one of the biggest expenses a homeowner can face. However, homeowners can reduce the cost by choosing a cheaper shingle type or by opting for partial reroofing. Regardless, it’s important to hire a licensed roofing contractor for the job. This ensures that the contractor has the necessary skills to complete the work quickly and efficiently. In addition, it helps protect the homeowner from any legal issues that could arise if they attempt the job themselves.

Homeowners should understand the terms that their roofing contractor uses while discussing the price of the project. For example, most contractors refer to a “roofing square,” which is a unit of measurement unique to the industry that makes it easier for the contractor to calculate ordering and material costs. A roofing square is the equivalent of 10 by 10-foot sections of a roof or 100 square feet.

Another significant factor in the overall cost of a new roof is the type of materials used. Shakes, which are split into wedges to produce a natural, rugged look, are more expensive than shingles, which are sawmilled into uniform lengths and thicknesses for clean lines. Clay tiles are also more costly than shingles but have a longer lifespan, lasting 50 to 150 years.

Other factors that can add to the cost of a re-roofing project include the cost of materials, permits, waste removal, and other associated fees. Typically, the cost of replacing the roof decking is included in the total cost of the project, which can be more expensive than a full replacement.

Durability

Durability is a top consideration for homeowners when choosing a roof replacement. A durable roof is able to withstand rain, snow, sunlight, and wind, all while providing protection from the elements. The longevity of a roof depends on the material, climate, and installation. Asphalt shingles last 15 to 20 years, metal roofs up to 50, and slate can last for more than 100. Durability also depends on regular maintenance and repair, such as fixing leaks as soon as they occur. Leaks often happen at penetrations, such as plumbing vents or skylights. Adding weather stripping to these areas can help. Lastly, rooftop gardens (modern ones known as green roofs, traditional ones as sod or turf) offer insulating benefits and can help reduce urban heat islands. These roofs require a bit more maintenance, but can add beauty and value to your home.

Fireproofness

In areas at risk for wildfires, a fireproof roof is an important feature to consider. Embers from other homes or nearby vegetation can ignite your roof, damaging or even burning through it to reach the structure underneath.

Most roofing materials go through strenuous testing to determine their fire ratings, which are based on how they react during a fire and whether or not they produce flying embers. The best fire resistant roofing materials earn a Class A rating, which is the highest available and means they’re non-combustible and can survive severe fire exposure. Some examples include metal roofing, concrete tiles and composition shingles.

Many other roofing materials fall into the Class B and Class C categories, which aren’t as effective against fire or don’t withstand severe fire testing. These types of roofing materials can be treated with chemical retardants to make them more fire-resistant, but they aren’t as good as a Class A rated roofing material. Examples of these kinds of roofing materials are reconstituted wood products and untreated wood shakes or shingles.

The roof is the most vulnerable part of a home during a wildfire, and you want to be sure that the new or replacement roof is fire-resistant. Checking that your new roof is a class A roofing material is an important step, but you should also look at the entire structure of the building to ensure it’s fire-resistant as well.

For example, if your roof is made of clay tile, it’s a great choice for Southwestern, mission or Spanish-style architecture, but you need to be careful with upkeep. If the gaps between the underlayment and the soffit or roof sheathing aren’t properly sealed, embers can bypass the fire resistance of the tiles and damage the roof, insulation or electrical boxes.

Wind Resistance

The quality and durability of the roofing materials used to construct a roof have a major impact on its ability to resist damage from high winds. Homeowners in regions prone to strong storms and hurricane-force winds should prioritize wind uplift resistance when choosing a roofing material for their new roof or roof replacement.

When high-speed winds encounter a roof, they create updrafts that can lift shingles and force them away from the framing of a home. This can cause damage to the soffits and fascia, and may even tear off the roof itself. To reduce the risk of these damages, homeowners should regularly inspect their roofs for damaged shingles and make repairs as needed.

In addition, homeowners should consider the UL 1897 rating of their roofing material. This rating indicates how much wind uplift the roof can withstand, with higher numbers indicating greater resistance. Typically, the UL 1897 rating is listed in the roofing product specifications or on the manufacturer’s documentation. Homeowners can also consult with a professional roofing contractor for assistance.

Fortunately, there are several roofing materials that offer excellent wind uplift resistance. For instance, roofers often recommend asphalt shingle varieties that feature improved adhesive seals and reinforced designs to combat wind uplift. In addition, metal roofs can provide a strong barrier against uplift forces, due to their sturdy construction and lightweight design. Slate tiles are another popular choice for their strength and durability, which can help prevent uplift damage in storms.

Stamped Concrete – Durability and Versatility

The durability of Stamped Concrete Charles Town WV makes it a great choice for driveways, patios and walkways. It is also less likely to crack than other materials, such as bricks or stones.

Stamped Concrete

Using different textures adds to the visual appeal of a finished project. In this example, a slate texture has been used for the main area, with borders crafted in a brick effect.

As far as surface materials go, stamped concrete isn’t hard to keep looking its best. It’s a budget-friendly alternative to other materials like bricks, paving stones, or tile. It can even mimic the look of wood, giving your outdoor living spaces a touch of natural elegance. The key is regular cleaning and resealing. With this, your patio or pool deck will be able to withstand harsh winters and heavy traffic without showing signs of wear and tear.

To maintain a clean exterior, sweep the concrete regularly with a push broom or use a power washer on a low setting. A mild liquid cleaner can also help remove stubborn dirt or grease stains from the concrete surface. Just be sure to rinse it thoroughly afterwards to prevent a build-up of residue that can damage the concrete.

When it comes to indoors, a simple broom and mop should do the trick for most surfaces. However, a vacuum cleaner with a floor brush attachment can also be effective for areas that get a lot of foot traffic, especially those near doors or entrances. For tough stains, an alkaline cleaner can be useful, but always follow the manufacturer’s instructions and test on a small area first.

Another important step in maintaining your stamped concrete is having a water-repellent sealer applied to the surface. This helps to keep dirt, oil, chemicals, and other staining agents from penetrating the surface and damaging it over time. It can also make the surface less slippery, making it a safer choice for kids and pets.

A quality sealant should be used on all concrete surfaces, but it’s particularly beneficial for stamped concrete. Using one on your new stamped concrete will ensure that the color stays vibrant and protects against abrasions, water penetration, and other common deterioration factors. Your concrete installation contractor will be able to recommend the right product for your project.

Durable

Concrete is an extremely durable material that can be used to build foundations, driveways and sidewalks. It is also highly affordable compared to other paving materials. However, it lacks the aesthetic appeal of more decorative surfacing options. With the addition of stamping and coloring, concrete becomes a versatile material that can be utilized for a wide variety of outdoor applications. Stamped concrete is becoming an increasingly popular choice for patios, pool decks, driveways and more. Its durability and versatility make it an excellent option for commercial and residential properties.

To create a stamped concrete surface, the contractor pours regular concrete and then alters it before it hardens using a stamping tool with a design or pattern. This process allows the concrete to take on a unique appearance that resembles other types of materials, such as flagstone, brick or natural stone. The result is a beautiful, long-lasting surface that can enhance the curb appeal of your home or business.

Unlike pavers, stamped concrete is less expensive to install and maintain. It is also more durable than paved stones, as it can withstand the weight of heavy vehicles and harsh weather conditions. However, it is important to note that like any other type of paving material, stamped concrete can crack over time. This is particularly common in cold climates, where moisture from ice and snow seeps into tiny cracks and then expands as it freezes, causing them to grow bigger over time.

If you want to keep your stamped concrete looking its best, it is essential to seal it regularly. This will help to protect it from stains and moisture, as well as guard against abrasion and strong chemicals. It is recommended that you reseal your concrete every two to three years.

It is also a good idea to use a slip-resistant additive when applying the sealant, as this will help to prevent your concrete from becoming slippery when it rains or is exposed to ice and snow. With proper maintenance, stamped concrete can last for decades. However, if you are not diligent about cleaning and resealing it, the color may fade over time due to dirt, sun exposure or other environmental factors. If this occurs, it is easy to restore its original luster by resealing it.

Affordable

The old adage “you get what you pay for” applies to many home improvement projects. But with stamped concrete, you’ll save money compared to other landscape materials, and the results will outweigh the initial investment.

Stamped concrete can mimic the textures and colors of pavers, natural stone, tile, wood, brick and cobblestone at a fraction of the cost. It also offers more design options, such as wavy borders or contrasting color patterns. In addition, it can be poured and stamped without extracting existing landscaping. A quality contractor will provide a detailed estimate for the project, including costs of materials and labor. Make sure to compare quotes from several contractors and ask about the details of the job, including the specific texture and pattern you are looking for, as these can affect pricing.

It’s important to know that the concrete you’re working with is high-quality. This ensures that the stamping will be durable and long-lasting. It will also be resistant to cracking and moisture. In addition, a protective coating will be applied to the surface to protect against harsh chemicals and natural wear.

Another cost-saving advantage of stamped concrete is that it doesn’t require the extra expense of a vapor barrier or gravel base. This can cut your overall installation costs significantly by eliminating the need for these costly add-ons. Depending on the size of your project and complexity of the design, the cost of stamped concrete can range from $8 to $20 per square foot.

If you’re installing an outdoor kitchen, you may need to factor in the cost of appliances, a hot tub or grill and even seating. However, a stamped concrete patio can serve as an excellent backdrop for a relaxing backyard entertainment area where friends and family can gather to enjoy the warmth of your new outdoor living space.

If you are unsure of what your budget will be, ask your contractor to create a rough draft of the layout and cost. This will help you to understand all potential expenses and make sure that your vision for your patio is realistic within your price range. It’s also a good idea to inquire about potential upcharges, such as complex demolition or site prep issues that may raise the cost of your project.

Versatile

When compared to traditional concrete, stamped or imprinted concrete is more versatile. It can be designed to look like brick, flagstone, tile, wood or a variety of other textures and materials that add value to your home. In addition to its aesthetic versatility, it is more affordable and requires less maintenance than other outdoor paving options.

Unlike other outdoor flooring materials that can crack, chip or erode over time due to environmental conditions or heavy traffic, stamped concrete holds up well against wear and tear and maintains its beauty for years without the need for regular sealing or waxing. It is also a green, eco-friendly choice, which appeals to today’s homeowners who are concerned about the environment and want to make a statement of sustainability in their homes.

Stamped concrete can be used to create a unique, one-of-a-kind look for driveways, walkways, patios and pool decks. It can be poured into various shapes and forms to accommodate the existing layout of your backyard or other landscape elements like plants, trees and retaining walls. It can even be formed into steps or a custom pattern that integrates the look of stone or brick into your home’s architecture.

The color possibilities of stamped concrete are endless as well. By using different color release systems, it is possible to achieve a wide range of textures and hues to match any design imaginable. From simple shades that mimic natural materials to vibrant, eye-catching patterns that showcase an artistic vision, the versatility of stamped concrete allows you to customize your outdoor space and reflect your own style.

Because of its durability, longevity and cost effectiveness, stamped concrete is an excellent choice for outdoor spaces that demand a high level of functionality. From a practical standpoint, it is easy to install and can be done quickly over an existing concrete slab. In comparison to other paving options that require more labor intensive installation, such as pavers, it is a much faster and simpler process.

As for the upkeep, stamped concrete is fairly straightforward and can be easily maintained by routine cleaning and occasional resealing. Efflorescence, dirt and weathering can cause the surface to lose its original vibrancy over time, but this can be minimized by resealing on a regular basis.

Keeping Your Gutters Clear: Basic Cleaning Strategies

Clogged gutters can lead to water damage to your home and garden. Regular cleaning can help prevent this damage.

gutter cleaning

Gutter Cleaning Sarasota is a difficult job that requires a ladder and several tools to complete. Having a spotter with you can make this task more manageable and safer for everyone involved.

Gutter cleaning revolves around eliminating debris like leaves, twigs, dirt, and shingle grit that can lead to blockages in your guttering system. This process prevents rainwater from flowing over the sides of your house and causing stains, water damage, mold growth, and even leaks. The best way to clear this kind of debris is to use a wet/dry vacuum cleaner equipped with a hose attachment with a curved end to reach the gutter. This device allows you to stay safely on the ground rather than climbing a ladder, and it is a much safer alternative to using a leaf blower.

This device can also be used to flush out and inspect the downspouts for proper flow. This step is important because it ensures that any clogs or blockages that were missed during the initial cleaning have been removed and that the gutter system is functioning properly. In addition, a flushing and inspection of the gutters can reveal any additional damage or issues that need to be addressed in order to keep your roof and home safe and healthy.

The benefits of having a clean and unblocked guttering system go well beyond just preventing water damage. Gutters that are clogged can overflow and spill onto your property, damaging the walls, fascia boards, and even the foundations of your home. Keeping your gutters free from debris not only helps to avoid this but also reduces the risk of insect infestation and promotes the growth of tree seedlings, fungi, and other plant life.

Regular gutter cleaning also extends the lifespan of your roofing materials. The roof is one of the most vulnerable parts of your home, and it can be damaged easily by fallen leaves and other debris. If left unattended, the damage can quickly become more severe, requiring costly repair or replacement.

A clogged gutter can also trap ice in the winter, increasing the weight of your roof and possibly causing it to collapse under this stress. In addition, the trapped ice can cause water to back up and overflow the gutters, washing away shingles, rotting fascia boards, and damaging the foundation of your house. A professional gutter cleaning service will help you to prevent this from happening by ensuring that all of the debris is removed from your guttering system and funneled away from your home.

Ladder Safety

While cleaning your gutters, it’s important to use ladder safety. Ensure that your ladder is the right height for the job and secure it to avoid falls. Also, make sure your ladder has a good standing surface to prevent it from wobbling or slipping. Finally, be sure to wear appropriate protective gear such as gloves, goggles, and dust masks. This will protect you from irritants such as bugs, leaves, pollen, and mold.

Ladders come in a variety of shapes and sizes. Some have wide bottoms that distribute weight across a larger area to improve stability. Others have multiple sturdy reinforcement braces running underneath the steps to prevent bowing or breaking under a heavy load. Other features include ribbed tractions and thick rubber feet that grip well on smooth ground and roof surfaces to help prevent slippage.

Before using your ladder, check its condition and read the manufacturer’s instructions to find out how much weight it can safely bear. Be sure to account for the weight of all tools and gutter-cleaning attachments you will be carrying up and down the ladder. Also, position your ladder at a safe angle by following the “four-to-one” rule: for every four feet of ladder height, the base should be one foot away from the building wall.

When climbing up and down the ladder, keep your hips between the side rails to maintain balance and to avoid overreaching, which can destabilize the ladder and lead to a fall. Never climb higher than the maximum number of rungs on the ladder or exceed its load rating. Also, take frequent 30-minute breaks to prevent fatigue.

When working at a high level, it’s best to work in sections. This will reduce the risk of falling off the ladder or hitting your head on the gutters or house when you reach too far. Additionally, it’s important to use a spotter when working on the top of the ladder to provide support and safety. Ladder safety is a complicated topic that goes beyond this article’s scope, but following these basic tips will significantly reduce your risk of injury while cleaning your gutters.

Downspout Clearance

The gutter’s downspouts are a vital element in keeping water from destroying landscaping and slowly eroding residential and commercial roofing, and they can become clogged with leaves, dirt and other debris. Clogged downspouts can also cause flooding and foundation problems. To keep your gutter system working effectively, it’s important to regularly inspect and clean downspouts.

When cleaning your gutters, make sure you’re using a ladder that’s tall enough to reach the highest sections of the gutter. It’s also a good idea to have a friend or family member standing nearby to steady the ladder, control foot traffic in the area and call for help in case of an accident.

A downspout can become clogged by leaves and other debris, so it’s important to check and clean it during gutter cleaning. Clogged downspouts can flood your landscape, leak into your basement or erode the foundation of your home. To keep your gutter system working properly, it’s a good idea to install gutter guards, which prevent debris from entering the downspouts.

It’s also a good idea to add a downspout extension at the bottom of a gutter section that hangs down too low for the landscape. This will allow you to lower the downspout and keep it from hitting the ground when it’s raining. Downspout extensions can be made of a variety of materials, including copper, aluminum, steel and vinyl. Choose one that matches the color of your gutters and blends into your landscaping.

Another tip for gutter cleaning is to start at the corners and work your way toward the center. This will help you avoid moving debris from the corners into the downspouts, where it can create a logjam that is difficult to remove. You can use a hand trowel or a scoop designed for gutter cleaning to clear debris. A plumber’s snake is a great tool for removing clogs from downspouts.

Some gutter cleaners may accept tips, but this is up to you and the company’s policies on remuneration and compensation. You can usually find out this information by contacting the gutter cleaners directly.

Cleaning Tools

Gutter cleaning tools are designed to reduce the amount of work it takes to clear debris from your gutters while maximizing safety and effectiveness. These tools are used with a ladder to access your gutters, and they include items such as a garden trowel or scoop for removing gunk and a bucket for collecting debris. Some gutter cleaners also come with a wet/dry vacuum attachment or a pole that attaches to wands or brush handles for added reach.

A general must-have for any gutter cleaning project is safety gear including gloves and eye protection. A sturdy ladder that extends at least four feet above gutter height should be used for any cleaning job, and it is recommended that the ladder be secured to something stable on the ground before using. A garden hose should be ready for use as well, and a garbage bag is helpful to contain the debris while cleaning.

Some people choose to clean their gutters by hand, but it is important to understand that you are working above a potentially dangerous height. To ensure your safety, always use the three points of contact rule with any ladder – one foot on each rung and one hand gripping the ladder. If you need to reach an area that is hard to get to, it is a good idea to have a partner nearby to assist with lifting and supporting the ladder.

A gutter-cleaning kit is a useful tool for both homeowners and professional contractors who want to save time and effort while cleaning their gutters. These tools fit on standard Acme tip traditional or extension ladders and can be attached to a hose for spraying water into the gutter to dislodge leaves, twigs, and other debris. The angled gutter cleaning nozzle is also great for reaching behind structures on the roof, such as skylights.

Another popular gutter-cleaning tool is a gutter snake or tongs that can grasp debris and pull it out of downspouts. These are ideal for tackling tougher debris or large chunks of dirt that may be stuck inside the gutter. If your gutters are very clogged, there are also many attachments for wet/dry vacuums and pressure washers that can help clear the blockage.

Life Insurance Companies – What You Need to Know

In return for premium payments, life insurance companies promise to pay a pre-decided amount to beneficiaries after the policyholder’s death. These benefits can help ease financial burdens for grieving loved ones.

Insurance

A top-rated company should provide a wide range of coverage options. Other important factors include customer service and financial stability ratings. Contact Life Insurance Companies Las Vegas for professional help.

Life insurance is a type of financial product that pays out a lump sum, or death benefit, to your beneficiaries in the event of your death. The purpose of the payout is to provide your loved ones with the money they need to cover expenses and replace income. Depending on your policy, it may also pay for debts and funeral costs. It is important to consider your family’s financial situation before deciding whether or not you need a life insurance policy.

There are many different types of life insurance policies, and each one is designed to meet the needs of specific groups of people. Some are more expensive than others, but most can be tailored to meet your needs. Some companies offer life insurance without a medical exam, which can be beneficial for those with health conditions that prevent them from getting coverage through traditional underwriting.

The main differences between life insurance policies are the length of coverage, the amount of the death benefit, and the premium. Term policies provide protection for a limited period of time and are often the cheapest options. Those who need permanent life insurance can choose from whole, variable, or universal life insurance. Permanent policies can have cash value, which builds over time and can be withdrawn or used to reduce the premium.

Some life insurance policies include riders that allow you to add extra coverage or customize your policy. It is important to look for a company that offers these riders and can explain how they work. You should also check the company’s customer satisfaction rating from third-party sources like J.D. Power and look for a high credit-rating from independent agencies like AM Best.

If you want to buy a life insurance policy, it is essential to find a company that is financially strong and has low customer complaints. If a company has too many complaints, it can affect your ability to file a claim. Moreover, a high complaint rate can also cause problems with the underwriting process and increase your life insurance rates. A good way to avoid this problem is to purchase a policy from a company that underwrites its own products.

It pays a death benefit

Purchasing life insurance provides your loved ones with a safety net in the event of your death. The death benefit is a lump sum of money that can help your family with any immediate financial burdens that may arise in the aftermath of your death. It can cover funeral expenses, outstanding debts, and monthly bills. Choosing the right policy will depend on your budget, ongoing financial needs, and the number of people you want to support with the death benefit. A financial advisor can help you choose the appropriate amount of coverage.

A beneficiary is the person you name on your life insurance policy to receive your death benefit in the event of your death. It is important to update your beneficiaries regularly, especially around major life events. This will prevent your beneficiaries from having to contest who is entitled to the payout.

You can also change your beneficiaries at any time, but you must provide a new beneficiary form to the insurer. This form should include the name and address of the new beneficiary, along with their Social Security number. You can find the form in your insurance provider’s documents or online. Then, submit the form with a certified copy of your loved one’s death certificate and other required paperwork.

If you’re the beneficiary of a life insurance policy, it’s best to contact the insurer immediately after the insured person’s death. Then, you can complete a short claims form. The insurer will confirm the death (and that it was covered under the policy-suicide or a death related to illegal activities are usually not covered). After your claim is approved, you’ll receive your death benefit in the form of a check.

A life insurance death benefit can be a great gift for your family, but you should make sure you’re buying from a reputable life insurance company. It’s a good idea to assess the company’s financial stability by checking its ratings from third-party agencies, such as AM Best, Standard & Poor’s, Fitch, or Moody’s. A higher rating means the company has a better history of paying out death benefits.

It can be a loan

Whether you need money for a medical bill or to pay off your credit card, life insurance loans can be an attractive alternative to other forms of financing. But before you take out a loan against your life insurance, be sure to exercise due diligence and understand the risks involved. You should also consult with your insurance company about how a policy loan will impact the components of your life insurance. You should ask for an in-force policy illustration, which will show how the loan will affect each component of your policy.

The process for obtaining a loan from your life insurance provider can vary by company, but it’s generally straightforward. You’ll need to verify that your policy includes a borrowing provision and that the cash value component has accumulated to the minimum amount required for a loan. Depending on the type of policy and its rules, it could take several years for your life insurance to build up enough cash value to qualify you for a loan.

Once you’ve established that your policy is eligible for a loan, you can complete the process by completing the required paperwork and signing a loan agreement. The insurance company will then deposit the funds into your account. Most life insurance loans have comparatively low interest rates and do not require a credit check or employer and income verification, which can make them an appealing alternative to traditional loans. However, if you don’t repay the loan balance within a certain timeframe, you may face a tax penalty.

Repayment of a life insurance policy loan is simple. It can be done in one of three ways: by paying the insurance company directly, using the borrowed amount to purchase a new policy or by drawing on the policy’s cash value. In the latter two scenarios, a portion of the death benefit will be reduced to pay off the loan balance, so you’ll want to ensure that you have an adequate level of life insurance coverage to cover any remaining debt.

The simplest way to repay a policy loan is by paying it off in full. This increases the policy account value and death benefit on a dollar-for-dollar basis and prevents the borrower from accruing significant interest.

It can be a contract

A life insurance policy is a contract between an insurer and the insured. The insurer promises to pay a lump sum to the beneficiaries in the event of death of the insured, in exchange for premiums paid by the insured. Life insurance is an effective way to secure your family’s financial future in the event of your death or injury. There are many different kinds of policies, and each has its own specific requirements. If you want to purchase a life insurance policy, you can get a rate quote online or call an agent. Some companies may require you to undergo a medical exam, which can be done at home or in an office. Some companies also offer no-exam life insurance for people who qualify.

A person who owns a life insurance policy is called the Policyowner, and may be an individual or a business entity such as a partnership or corporation. Some policies allow the policyowner to change clauses and provisions by submitting an endorsement. An endorsement is usually called a rider. Policyholders can use riders to increase or decrease their coverage and to change the beneficiary.

The underwriting process determines whether the company will accept an applicant and how much to charge them for their life insurance premium. The underwriter considers several factors including age, sex, health, occupation and lifestyle habits. A company may reject an application if it finds that the applicant poses a high risk due to health conditions or other reasons.

When the policyholder dies, the beneficiary receives a payout, which is typically the face value of the insurance policy. The payout can be in the form of a lump sum, monthly payments or an annuity. Some policies may have a savings element, which allows the policyholder to accumulate money in an account over time. These funds can be used to supplement the death benefit if needed. In addition, some policies may provide for a return of a portion of the premium paid by the policyholder at the end of the term.

Drywall Repair Isn’t Indestructible

Drywall is a durable material, but it isn’t indestructible. A door knob, a vacuum cleaner, or a child flinging a toy can all dent it.

Drywall

Small holes can be repaired easily with a drywall patch kit. Just be sure to buy a roll of paper tape and a gallon tub of joint compound. Contact Las Vegas Drywall Repair for professional help.

Water damage to drywall is one of the most common issues homeowners encounter. Left unchecked, this type of damage can lead to mold and mildew and may even cause structural problems in walls and ceilings. Water damage is caused by many different things, from flooding and hurricanes to burst pipes and sink overflows. Homeowners should regularly inspect their homes for signs of moisture, such as stains on walls or ceilings, or a musty smell. If you spot any of these issues, call a professional right away to help fix the problem before it becomes serious.

The first step in repairing water damaged drywall is to locate and fix the source of the problem. Once you’ve done that, the next step is to fully dry the affected area. To do this, you can drain standing water from the area and use an area fan to help circulate air. You can also use a dehumidifier to further reduce humidity in the room. If possible, open the doors and windows to further assist with drying. On average, it takes three days for wet drywall to completely dry.

Once the drywall is dry, you can patch the hole. If the drywall is severely damaged, you might need to replace it entirely. However, in less severe cases, you can patch the drywall by cutting out the damaged area and inserting a new piece of drywall. The replacement drywall should be about 2 inches longer and wider than the original drywall, so you’ll need to cut a straight line using a pencil or a ruler. You should then remove any insulation (fiberglass, mineral wool, cellulose or wood fiberboard) that’s inside the wall.

If there’s any black mold present, it should be professionally remediated by a professional. Mold in drywall is not only unsightly, but it can also be toxic and harmful to your health. If there’s a lot of black mold in the drywall, it may be a sign of a more severe issue and should be addressed immediately by professionals.

Holes

Whether from nails or screws that are used to hang something on the wall, or a doorknob-sized hole caused by a slammed door, drywall is not indestructible. Holes and dents are often a sign that the drywall is past its prime and needs to be replaced. Luckily, holes are one of the easier home repair projects to tackle if you have the right tools and follow a few key steps.

Drywall patch kits are designed to take the guesswork out of fixing a hole in drywall. The first step is to use the patch kit to place a sheet of mesh over the hole, making sure that it is completely covered with no jagged edges, then a layer of drywall joint compound (aka mud) is spread over the top of the patch and smoothed out around the edges to blend with the rest of the wall. This is then left to dry overnight. If you or a painting service plan to repaint the area, it’s important that the mud is lightly sanded down to create a flush surface.

When the sheets of drywall meet at corners, an L-shaped metal strip called corner bead is nailed over the joints and concealed with another layer of joint compound. Corner bead is not indestructible, however, and can become dented from a slammed door, flying toys, or furniture that’s being moved. It’s important to repair these dents quickly and thoroughly before they can cause further damage to the drywall or lead to a leak.

While you’re working on repairing holes or dents, it’s important to use a stud finder to locate and mark the nearest studs on either side of the damaged area before cutting into the drywall. This ensures that you don’t accidentally cut into electrical cords or plumbing lines.

While you’re doing your repairs, be sure to keep a close eye on children and pets in case they run into the work area. This can prevent accidental injuries that could result in even more expensive home repairs down the road. It’s also a good idea to regularly inspect the house for pests like termites and carpenter ants, which can cause significant damage in a short amount of time.

Cracks

If you have a few small cracks or indentations in your drywall, they can easily be repaired with spackle and a smoothing tool. Then, with a little interior painting over the area, the wall will look as good as new. Larger holes or cracks, however, may require a more extensive patching job.

Cracks in drywall can be caused by normal settling, moisture damage or a number of other issues. They often appear along a seam in-between drywall panels or near doors and windows. Cracks are most commonly found in older homes, but can also be seen in newly constructed houses. Regardless of the cause, they should be repaired as soon as possible to prevent further damage and potential structural problems.

When a crack appears in your drywall, the first step is to clean the surface thoroughly with a vacuum cleaner or brush. This will help the drywall repair adhere properly. Next, apply a liberal layer of drywall compound or spackle to the crack. Once the compound has set, sand it smooth using coarse grit sandpaper and then use fine sandpaper to remove any remaining traces of the repair. Finally, apply a coat of primer to the repaired area and allow it to dry before applying your choice of paint.

Normal settling: Cracks in drywall that occur naturally and are not the result of a structural problem are usually referred to as hairline cracks. These are not uncommon and are a result of the house shifting and expanding as the foundation settles. These cracks are not a serious issue, but should be monitored over time.

Moisture damage: If you notice a pattern of drywall cracks that are accompanied by brown or yellow tinted stains, it’s likely due to water damage. Leaky windows and roofs can cause moisture to build up in the walls, which causes the drywall to soften and eventually crack. If left untreated, this can lead to mold and other serious issues.

Other causes of drywall cracks include stress, thermal changes and hanging heavy items on the wall. To reduce the likelihood of cracks, make sure to hang light items evenly across the wall and to avoid placing a lot of stress on one section of the wall. It’s also important to maintain a consistent temperature throughout the house and avoid drastic fluctuations.

Mold

Mold is a major problem that can occur when drywall becomes exposed to moisture. It can also be caused by plumbing issues or improper insulation that allows moisture to gather inside a wall. When this happens, it’s essential to take steps to remove the mold and identify the cause of the problem in order to prevent it from occurring again. Mold in a home or apartment building can affect residents’ health, especially those with allergies or asthma. It can also weaken the structure of a wall and lead to further problems, so it’s important to address the issue as soon as possible.

If you notice a mushy or bubbling area of your drywall, it’s likely because of mold. Mold grows wherever there’s something organic (food for the fungus), oxygen, and moisture, which drywall absorbs very easily. Mold is most often found in areas of your walls with water damage. It can appear as dark spots or patches on the walls, or it may look like a damp spot that’s not quite dry yet.

Drywall with mold is usually a sign that there’s a more serious problem, such as water leaks or rotted wood in the studs behind it. It’s important to contact a professional for a drywall repair in this case, as moldy drywall will need to be replaced so that the mold doesn’t spread and create a bigger problem.

Mold in a house or apartment can affect residents’ health, including those who don’t have any allergies or asthma. It can weaken the structural integrity of a building and contribute to further problems, such as leaks or cracks in other parts of the house. It can also make it difficult to breathe, causing respiratory infections and lung conditions.

Depending on the severity of the mold, it may be necessary to replace the entire sheet of drywall in the affected room. However, if the mold isn’t too bad and you catch it quickly, it may be possible to clean the moldy drywall and paint it again without replacing it. To do this, you’ll need to apply a second coat of joint compound and sand it to smooth and feather the edges before painting.

The Importance of Concrete Repair

Concrete is not indestructible and it wears down over time. Repairing concrete problems promptly helps prolong its lifespan and avoid costly replacement activities.

concrete

There are several types of concrete repair. Structural repairs address structural issues while decorative repair addresses aesthetic concerns. Concrete can also be repaired with a variety of materials. Visit Website to learn more.

Concrete surfaces are exposed to a number of damaging conditions. Whether it is rain, ground movement, or the presence of certain chemicals, cracks in concrete will eventually appear. However, this damage can be easily repaired with proper maintenance and the right repair products. Crack repair in concrete is the first step toward a strong, durable surface.

Before any concrete repair begins, it is important to identify the type of crack and the condition of the surrounding concrete. It is also essential to understand the underlying cause of the cracking. If the crack is caused by a structural problem, such as insufficient support, it will not be permanently repaired.

The most common concrete repair method is to fill the crack with a concrete sealant. This can be purchased in a wide variety of formulations to suit the application. Some of these products are made with polyurethane, which is extremely resistant to chemicals and other substances that could degrade concrete. Others are epoxy or latex based and require less labor to apply. It is important to clean the area of a crack thoroughly before applying any product. This includes removing any loose gravel or debris, as this can keep the repair material from adhering properly to the surface.

Narrow cracks in concrete may be fixed using a process known as stitching. This consists of drilling holes in the sides of the crack and then connecting them with metal rods. This allows the concrete to expand and contract in a more controlled manner, reducing the stress placed on the cracks.

Larger cracks can be filled with a routing and sealing method, which involves cutting the concrete to create a backward-angled V shape. This provides more space for the sealant to adhere and helps prevent future cracking. This method is typically used for dormant cracks, but it can also be applied to active cracks if the proper sealant is used.

Another option for fixing cracks in concrete is to use hydraulic cement. This is a liquid that fills thin cracks to full depth. It is important to dry the cracks before using this product and to choose a product that is appropriate for the environment.

Repairing Splits

Concrete is one of the most popular building materials in use around the world. It’s strong and durable, but even the toughest concrete is prone to damage over time. Cracks, chips, and sunken areas are just some of the many problems that can arise in both old and new concrete surfaces. Fortunately, there are repair methods available to address these issues and restore the integrity of your concrete surface.

When repairing splits in concrete, it’s important to start with the right tools and materials. This ensures that the concrete repair is done correctly and will last for a long time. Before attempting any repairs, it’s also important to understand the cause of the split and how it can be fixed.

Often, splits are caused by poor workmanship during construction. If this is the case, it’s essential to hire a professional to carry out the repairs. A concrete restoration contractor will be able to inspect the damaged area and make recommendations accordingly.

To begin the repair process, it’s necessary to remove any existing material from the crack in the concrete. This can be difficult if the crack is deep and wide, but it’s important to do so in order to ensure that the repair will hold. If any loose material is left behind, it can prevent the concrete filler from adhering to the rest of the concrete and eventually causing the split to reopen.

For larger chips and pitted areas, a mortar mix can be used to fill the damage. The mix should be made with a combination of 1 part Portland cement, 3 parts masonry sand, and just enough water to form a thick paste. It’s important to moisten (but not drench) the area before applying the mortar mix, and to press down firmly as you work to eliminate any air pockets.

The concrete patch should then be cured as per the manufacturer’s instructions. When the patch is cured, it’s important to test the strength of the concrete using a rebound impact tester. This device measures the strength of a concrete structure by using a spring-powered hammer to hit it against the surface and then measuring how far it bounces.

Repairing Sunken Areas

Concrete is the most widely used building material in the world, and while it’s very durable, concrete surfaces can deteriorate over time. Weathering, heavy foot or vehicle traffic, and settling can all lead to damage that needs repair. Luckily, there are many ways to fix damaged concrete, and some of them can be completed quickly and inexpensively.

Surface repairs are typically made using a patching material that fills in cracks, spalling, or surface wear. These types of repairs are non-structural and may need to be repeated periodically as the patching material can wear down over time. For more extensive damage, however, full concrete replacement is usually necessary.

When repairing sunken areas, it’s important to choose the right concrete repair product for the job. Look for products with a high level of performance, as this will ensure that the repair is long-lasting and will not need to be replaced. Also, be sure to use a product that is eco-friendly and safe for the environment.

The use of foam or urethane injections can be an excellent solution for sunken concrete repairs. These products expand to many times their original volume, forcing sunken concrete back up to its proper position. They can be used on a variety of surfaces, including driveways and pool decks. In addition, these types of concrete repair solutions are quick and easy to implement, allowing homeowners to use their repaired surfaces almost immediately.

Another option for sunken concrete repair is mudjacking. Mudjacking involves forcefully pumping slurry materials (mud) under the concrete to raise it back up to its original position. Mudjacking is less expensive than traditional concrete repair methods, but it is not as effective.

Once the repair is complete, it’s important to perform tests on the concrete to determine its strength and durability. A common test is the rebound test, which uses a spring-powered hammer to measure how far the concrete bounces. This method is fast and accurate, but the results can vary depending on debris or internal rebar. It is recommended that a professional conduct the testing to ensure accurate results.

Repairing Leaks

Concrete can withstand the stresses of everyday use, but it can be damaged by water. Water leaks are a major cause of damage to concrete structures and building, and if not addressed quickly, will lead to costly structural repairs.

The best way to stop a leak is to prevent the water from getting into the concrete in the first place. This can be accomplished by properly designing the structure and securing the plumbing lines in the slab. Leaks in concrete are most commonly caused by faulty plumbing installations or shifts in the soil beneath the slab that weaken and crack metal plumbing lines.

Once the leaking concrete is exposed, there are several options for repair. The simplest and most cost effective option is to fill the leak with a quick-setting cement product like Kryton’s Krystol Plug(tm). This is a hydraulic cement that uses crystalline technology to respond to water intrusion. It forms insoluble needle-shaped crystals to plug capillaries and micro-cracks, allowing no more water through the concrete.

If the leak is deeper in the concrete, a drilled chase hole can be filled with an epoxy grout. This is a thicker product that will not only fill the chase hole, but it will also fill the surrounding area of the concrete and seal the leak. This type of product will also work in cases of high hydrostatic pressure.

Another method of repairing a leak in concrete involves using a patch or a repair mortar. These are cement-based materials that can be troweled to create a smooth surface, making the patch or repair less noticeable. The mortar will be designed to bond with the existing concrete and is typically made of Portland cement.

In addition to addressing the damage caused by water, a professional contractor will provide a range of other services for your concrete restoration project. This can include cleaning and sealing the concrete surface, repairing any existing cracks or flaws, and even removing and replacing the concrete.

Choosing a contractor with the right experience and expertise is crucial for your concrete repair restoration project. The contractor will have the skills, equipment, and high-quality materials needed to ensure your concrete repair is done correctly and will last for years to come.